Jentic MCP + Windsurf
Goal — In a few minutes, you’ll enable Jentic MCP tools in Windsurf, allowing you to find, inspect, and run external APIs directly in your coding workflow.
What you’ll get
With Jentic MCP configured in Windsurf, you'll gain access to powerful tools:
| Tool available in Windsurf | What it does |
|---|---|
/search_apis |
Type what you need (e.g., "Send Discord Message", "Find New York Times Articles") and MCP lists matching APIs. |
/load_execution_info |
Select any result to view its full spec (URL, parameters, auth requirements). |
/execute |
Fill in the parameters and run the API or workflow – the response appears in your Windsurf interaction. |
Before you start
Ensure you have the following:
| You need | Why | Quick install |
|---|---|---|
| Python ≥ 3.8 | Required for uv/uvx and Jentic CLI. | python.org |
| Windsurf | The AI coding assistant where MCP tools run. | Windsurf |
| uv / uvx runtime | Launcher that runs the Jentic MCP server. | Install with pip: pip install uv (any OS) or with Homebrew (macOS): brew install uvIf you have trouble with uvx, see Troubleshooting: Making Windsurf See uvx below. |
1. Get Your API Key (if you don't have one already)
To use the Jentic SDK or MCP Plugin, you must obtain your API key. The easiest way is using the Jentic CLI. You can optionally include an email address for higher rate limits and for early access to new features.
pip install jentic
jentic register --email '<your_email>'
This will print your API key and an export command to set it in your environment:
export JENTIC_UUID=<your-api-key>
Alternatively, you can use curl to register and obtain your API key:
curl -X POST https://api.jentic.com/api/v1/auth/register \
     -H "Content-Type: application/json" \
     -d '{"email": "<your_email>"}'
2. Configure Windsurf to use Jentic MCP
- Open Windsurf. (If it's already running, you might still need to restart it later for changes to fully apply, but you can proceed with configuration.)
-
Access your Windsurf MCP configuration file (
mcp_config.json):The easiest way to open (or create if it doesn't exist) your
mcp_config.jsonis through the Windsurf interface:-
Via Windsurf's MCP Configuration UI (Recommended Method): a. In Windsurf, click the MCP status icon (it might look like a hammer), as shown below:
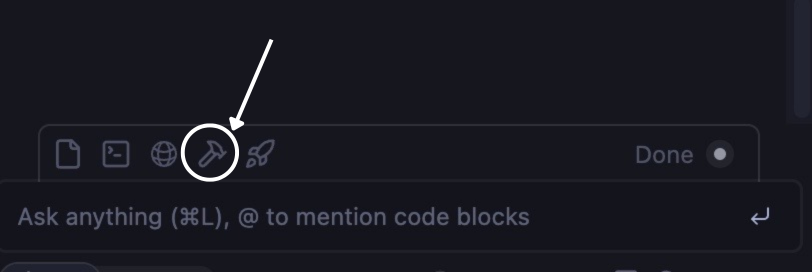
b. From the menu that appears, select "Configure" (or a similarly named option like "Edit Configuration"). This action will directly open your
mcp_config.jsonfile in your default text editor.
If you prefer, or if the UI method isn't available or you can't locate the icon, you can manually find and open the file.
-
macOS:
~/.codeium/windsurf/mcp_config.json- Terminal:
mkdir -p ~/.codeium/windsurf open ~/.codeium/windsurf/mcp_config.json - Finder: ⇧⌘G →
~/.codeium/windsurf/
- Terminal:
-
Linux: Common locations:
~/.config/Codeium/Windsurf/mcp_config.json~/.codeium/windsurf/mcp_config.json- Flatpak:
~/.var/app/com.codeium.windsurf/config/Codeium/Windsurf/mcp_config.json - Terminal:
xdg-open ~/.codeium/windsurf/mcp_config.json
-
Windows:
%APPDATA%\Codeium\Windsurf\mcp_config.json- File Explorer: paste
%APPDATA%\Codeium\Windsurf\in the address bar, create the file if missing. - PowerShell:
notepad $env:APPDATA\Codeium\Windsurf\mcp_config.json
- File Explorer: paste
-
-
Add or update the Jentic MCP server configuration: Paste the following JSON into your
mcp_config.jsonfile.- If the file is new or was empty (Windsurf might create an empty structure if you used the "Configure" option on a non-existent file), you can paste the entire block below, potentially replacing any minimal content Windsurf added.
- If the file already contains an
mcpServersobject with other servers, carefully add the"jentic": { ... }entry within it, ensuring correct JSON formatting (e.g., add a comma before it if it's not the first server entry).
{
  "mcpServers": {
    "jentic": {
      "command": "uvx",
      "args": [
        "--from",
        "git+https://github.com/jentic/jentic-tools.git@main#subdirectory=mcp",
        "mcp"
      ],
      "env": {
        "JENTIC_UUID": "<your-api-key>"
      }
    }
  }
}
- Save the
mcp_config.jsonfile. - Restart Windsurf for the changes to take full effect and load the Jentic MCP server. (Even if Windsurf opened the file for you, a restart is crucial after modifying the configuration.)
3. (Optional) Add API keys and Environment Variables
Some APIs discovered via /search_apis and inspected with /load_execution_info will require API keys, tokens, or specific base URLs. You can add these as environment variables in your Windsurf MCP configuration so they are automatically available to the Jentic MCP server.
Steps
- Open the same
~/.codeium/windsurf/mcp_config.jsonfile. - Insert or update the
envblock inside thejenticserver configuration. - Save the file and restart Windsurf.
Full example after adding keys
{
  "mcpServers": {
    "jentic": {
      "command": "uvx",
      "args": [
        "--from",
        "git+https://github.com/jentic/jentic-tools.git@main#subdirectory=mcp",
        "mcp"
      ],
      "env": {
        "JENTIC_UUID": "<your-api-key>",
        "DISCORD_BOTTOKEN": "<your-discord-bot-token>",
        "OPENAI_API_KEY": "<your-openai-api-key>"
      }
    }
  }
}
Security tip: The
mcp_config.jsonfile is plain text. Ensure it's stored securely, especially if it contains sensitive API keys.
4. If something doesn’t work
| What you see / Problem | Try this |
|---|---|
| Jentic MCP tools not available in Windsurf | Check mcp_config.json for JSON syntax errors (e.g., missing commas, incorrect brackets). Ensure Windsurf was fully restarted after any changes. Check Windsurf's logs for MCP-related errors. |
| “command not found: uvx” (in logs or error) | uvx is not in a path Windsurf can see. See "Troubleshooting: Making Windsurf See uvx" below for details. |
| API calls fail (e.g., 401/403 errors) | The API likely requires authentication. Use /load_execution_info to check its requirements, then add necessary API keys/tokens to the env block in mcp_config.json (see Step 5). Restart Windsurf. |
| Other errors from Jentic MCP tools | Check Windsurf's logs for more details. For advanced debugging, you can run the Jentic MCP server manually and inspect its direct output/logs. |
Troubleshooting: Making Windsurf See uvx
Windsurf, like many applications, might not automatically pick up binaries added to your shell's PATH via files like .zshrc or .bashrc. Choose one of these options:
Option A – Homebrew / System package (macOS & Linux)
- Homebrew (macOS) or your distro’s package manager / a
sudo pip install uvdropsuvxsomewhere Windsurf already looks:/usr/local/binon Intel Macs & most Linux distros/opt/homebrew/binon Apple Silicon
If which uvx returns a path, you’re good – skip this section.
Option B – pip / pipx / pyenv (user-local installs)
If uvx lives in a user-local directory, expose it via a symlink (macOS/Linux) or by adding the folder to PATH (Windows).
- macOS / Linux – symlink
sudo ln -sf "$(which uvx)" /usr/local/bin/uvx # use /opt/homebrew/bin on Apple Silicon sudo ln -sf "$(which uv)" /usr/local/bin/uv - Windows – PATH
- Locate the folder containing
uvx.exe(e.g.%USERPROFILE%\AppData\Roaming\Python\Python311\Scripts). - Add that folder to Path in Environment Variables….
- Restart Windsurf (and any open terminals).
- Locate the folder containing
Option C – Hard-code the full path
Skip PATH tweaks entirely and set the absolute path to uvx / uvx.exe in the command field of mcp_config.json.